I've been spending way more time behind the computer screen than I have behind the sewing machine these days. Writing a pattern, at least if it's a fairly extensive one, is not exactly a weekend project. I always love it when others share those behind the scenes moments of what it really takes to make something happen, so I thought I would do the same and share a bit of my pattern writing process.
While EQ7 has its many ins and outs that have to be learned, overall I'm pretty satisfied with what the program can do. When I work on a pattern, I usually hand draw what I am working on first, and then I have to translate it into a usable form, and for this I usually end up doing a lot of work in the PatchDraw + Motif section. This is where I can make applique shapes that I can layer on a quilt.
After scanning my drawing, I can import it into EQ7. From there I go to the Tracing Image tab, at the bottom of the worktable, and select the image that I want to work on. There is an option to crop the image and then fill the image in for editing.
At this point, I can then use the Line Tool, Bezier Curve Tool, and the Shape Tool to trace and then manipulate the illustration.
Once I am finished with an image, I can also export it to use for block assembly illustrations and instructions, or whatever decorative additions I would like to add.
When I was catching up on the pattern writing series last year from Meadow Mist, one of the guest designers passed along one of the best tips for me. Sew Fresh Quilts, shared that she uses(d) Power Point for some of her illustrations.There is no doubt that there are some really fancy-schmancy graphic programs out there that perhaps make it look like kindergarten, child's play, but I have to say for a not-so-computer-savvy person like myself, I'm impressed and surprised by the ease of use with decent results. Both of these assembly illustrations were make using Power Point:
One of the most beneficial websites that I've stumbled onto recently is Pixlr.com. The reason this has been so valuable to me is that I can create PNG images for free. Basically, these are just images where the shape is "cut out", or transparent, and the background is not visible. The advantage is that you can layer the EQ7 shapes without having the background in the way. Here's what I mean. In this illustration, you can see the leaf on the right cannot be layered because the background belongs to the image.
There is a really great YouTube video that shows you step by step how to make an image transparent that can be used for layering, and looks instead like this:
So whether you are a hobby quilter or looking to turn your hobby into a career, perhaps these might be a few useful tips to use in your own quilt designs . Do you have an helpful quilt design or graphic design tips to pass along? Any favorite free online programs?
Are you ready for yet ANOTHER secret sewing project? Well, it would appear that I am. It all starts with that one little spark... you know, that spark that lights the first big idea, that leads to another, and then spreads like a wildfire until it is all consuming and cannot be stopped?
I've had it in my head for quite a while now to work on my own ALL applique pattern. I usually keep a few cluttered folders around with sketches and such when I work on a pattern. I don't always have an end result in mind at first, but the general direction is always clear. So, one little sketch turned to two, which turned into four, and by the time they had made it to six, they had made into EQ7 and you know what comes next... a few test blocks.

I suppose, I've been on such a roll with my Chuck Nohara blocks, that I'm starting to think in terms of "everything must be appliqued"... especially with starch. But one thing that I have to say about applique is that it generally tends towards traditional designs and is often pretty labor intensive. I realize that not everyone is a slow stitcher, or even a hand stitcher at all... including myself. I suppose that's what's been guiding this now third pattern in the works... a fresh and updated applique project with simple shapes that is still interesting enough for a seasoned hand stitcher without overwhelming the beginner appliquer by what feels like 1,000 tiny leaves in a single 8 inch block!
Sneaky peeks for now... geez, I've got two more patterns in the works that have to be knocked out soon... what are you working on?
To know how to move forward for this year, I thought that it would be helpful for me to look back through my previous posts to see where I stood with what I had set out to accomplish for the year, and then for each quarter. For starters, I ended up finishing ALL of my quarterly goals! My yearly goals, however, shifted and transitioned a lot, which is not to say that I didn't leave 2016 without a good number of finishes. I was able to finish six quilts, one of which was my own pattern! I had several finishes that never made it on my Finish-A-Long list, mostly because I thought that I would be working on other projects instead.
General Goals:
1. For the first time, I am trying to work with a yearly planner for my sewing projects. I know some of you organization experts out there might have just let out a gasp at that
one, but I suppose I've not felt the need for it since sewing has been my hobby and not my work...
2. Right now my main goal for the year is that I would like to transition from a hobby quilter to a professional quilt pattern designer. I suppose that I'm on the way, but releasing my next two patterns this year would make it feel like I'm there.
3. One of my quarterly goals from 2016 that I'm carrying over, and that I am quite happy with, is that I've made a good amount of headway with learning EQ7. Now don't get me wrong... I have definitely not arrived, but I'm pleased with how far I've come, especially considering the number of throw-your-computer-out-the-window moments I've had.
4. Working outside our comfort zone is just that... uncomfortable, which is why I want to push myself to take on more free motion quilting projects.
Project/ yearly goals (aka what's on my plate):
1. I'm so excited to be at the finish line for my second quilt! I'm planning on sending out the top to be quilted this month, and will share very soon. Oh, I will be looking for intermediate to advanced quilters to test it... did I mention curves, applique, and traditional piecing?
2. My second pattern is, at least style wise, quite different than my first pattern. I have finished the top of a small project from that pattern, and this is where I get to stretch myself with some free motion quilting practice.
3/4. If you're going to have an Alison Glass project in the works... then why not two? I shared on Instagram another Jeweled Kaleidoscope in the works with Alison's upcoming Sun Print 2017 collection (everyone say it together now... yum!)... and then sometimes when you're on the right path, inspiration taps you on the shoulder and says "hey, should we go the other way?" (aka 2nd project)


5. My Anna Maria Horner quilt is not exactly a "new" quilt, but my first quilt WIP that was re-birthed because of an IG link up party. I was fully ready to let this one sit and collect dust, but pulling is back out is more satisfying than expected.
6. The backing for my Bee Quilt is almost done, and then I just have to baste and quilt it. This was an extra project that I may not have started had it not been for the bee, but it will be a fun one to work on and finish.
7. My Half Square Triangle quilt started as an effort to use up some of those pretty left over snippits from various projects. This just grew, and grew, and now I realize that this too will have to have a backburner status. This is the latest layout that I've been playing around... hmmm, still up in the air.

8. My thrid quilt pattern is low priority, at least on the first half of the year. The whole project is cut and ready to go, and perfect for those take it with you projects that I need for our HH Patchwork Meetings. I have my projects sorted and ready to grab and go.
9. Now that our new bed is here, I pulled the Green Smoothie quilt back out to work on only to find out that my husband and I are not in agreement about the design layout. I really value his opinion, and since he is sleeping under it too, then I'll at least let him his say. Status: backburner
10. I have been drooling over Stitched In Color's Penny Sampler quilt for a REALLY long time now... I'm a sucker for samplers. This is my distraction along the way quilt when I am feeling the need to mix things up and take a breather. Since it is a 12 month QAL, it feels totally doable.
Gulp, when I see all those ten projects in black and white, then I realize that I've pretty much got my whole year planned out... and that doens't include distractions!?! Even as much as I like to juggle multiple projects, this might even push my limit. I suppose there's not time like the present, right?
... did you happen to notice what's so special about today?
Linking up to Let's Bee Social and 2017 Finish-A-Long.
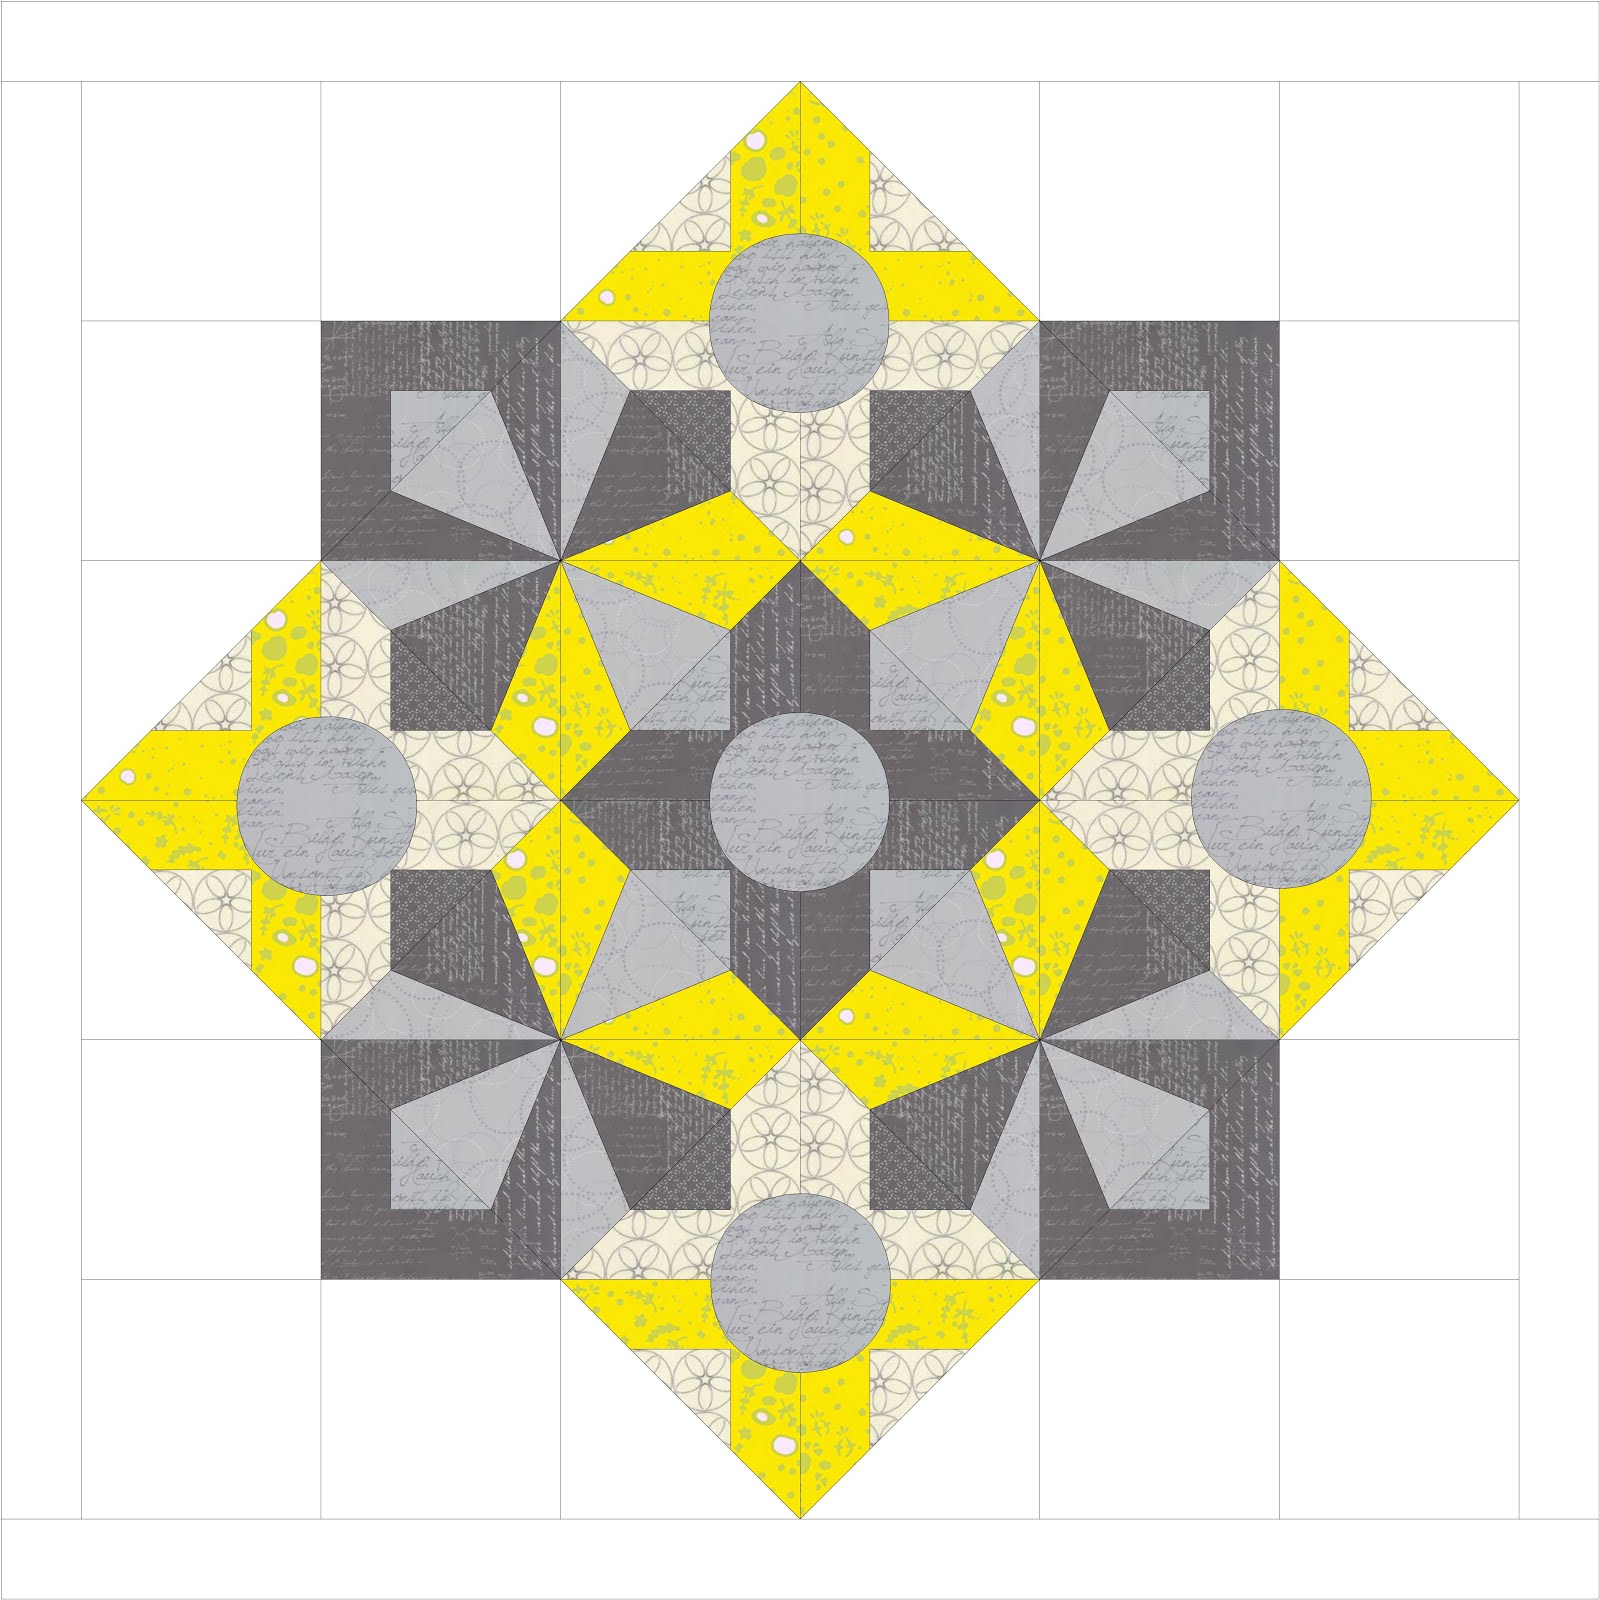
My Jeweled Kaleidoscope pattern, to be released this week, October 12th, comes also with the option to be made without the center circle appliques. I shared my pillow that I had made with a simple graduated color palette, but I wanted to share a few layout variations that could also be used for larger quilts.... and the amazing thing is that the change in design all comes from simple color placements.
For this first layout, I'm still stuck on these soothing cool colors using Basic Grey grunges mixed with some of my favorite printed fabrics.
... for this next layout, I wanted to have a little more negative space to show off the pinwheels. For the free motion quilter, so much negative space can be a dream.
Here is another graduated layout, but without the center circle appliques it takes on a completely different look. The accent is now on the strong navy contrasting petals.
Even though I don't really work with solids, I appreciate the heavy punch that they pack. And this layout in shades of purples, greys, and navys is no exception
For this quilt, there is a secondary graduation colorway. Firstly the graduation of the purple tones, and secondly with the movement fromgrey to blue tones. The navy accent petals bring even more contrast.
So, there's only one question let, have you decided how you want to make your Jeweled Kaleidoscope quilt?
Linking up to Let's Bee Social.
I really love what my pattern testers have come up with so far for my Jeweled Kaleidoscope pattern, and several have not only explored various color palettes, but also design variations. My first pattern tester, Mareike, really pushed the limits in exploring the kaleidoscope possibilies of this pattern. Read her blog post about finding the kaleidoscope structures in a soft color palette. I wanted to explore additional options with the same layout... and of course with lots of color!
Somehow I have really been drawn to the cool color palette, but also wanted to think about how this might translate into a warm color palette.
I've seen so many projects using a simple grey and citron colorway, and this combination shows what a nice compliement the two colors are to each other.
Even though I really had to work hard to build my purple stash, it really is a favorite color of mine. I couldn't resist using these Alison Glass fabrics combined with stash must-haves Zen Chic greys.
Another one of my pattern testers had the idea to put the blocks on point. Elina has a good feel for both color and design, and I love the well thought out little detailed accents that she included in her pillow. Here again, exploring with cool colors using my favorite Basic Grey grunges.
... and the same concept of the design on point, but with a few fabric placement changes. I love this strong, yet soothing blue background.
So, does this bring back memories as a child, looking through a kaleidoscope and being fascinatied about the endless designs that danced before your eyes? Well, it doesn't end here either... more to come next week as well as the official release on October 12th!
Next Wednesday, October 12th, is the official launch of my Jeweled Kaleidoscope pattern and I couldn't be more excited! Over the next weeks I wanted to share with you various projects and color options for using this pattern. Last week I shared the mini version without the center appliques, and it's amazing how a pattern changes with mere color changes. It has been helpful for me to shuffle colors around, and for comparison, first here is original version in cool colors paired with a soothing grey.
Next I changed the outer fabrics to a dark grey, and used the same soft grey for the center circles. I love how this looks with the center circles taking the backstage, and the background becoming more dominant.
I've had my eye on the Handcrafted Patchwork batiks from Alison Glass for a while now, but since you can't buy every fabric that you drool over, it's nice to still play with them in EQ7. Here I changed the center fabrics to the light grey and stayed with a graduated color palette like I did for the optional version. hmmm... perhaps a future fabric splurge IS actually needed.
Again, the same fabrics, but with a darker contrast for the background.
I've only gotten started with color inspiration, so be sure to stop back by this and next week for more color options and layouts. Wanna see what my pattern testers are creating on Instagram? See them under the hashtag #jeweledkaleidoscopequilt.
Linking up to Let's Bee Social.
My Jeweled Kaleidoscope quilt pattern is now in the hands of my pattern testers, and I'm really loving seeing so many takes on the same block! Be sure to check out what's happening on Instagram (#jeweledkaleidoscopequilt)... everyone has their own signature style and favorite fabrics. Oh, by the way... did I happen to mention that my pattern comes in two different sizes and an optional version?
The pattern is also available in a 18" mini size, which is perfect for pillows, wall hangings, etc. This pillow is for my living room and I love it! This is not only the mini version, but also the optional version without the circle appliques. (I realize that applique is perhaps not everyone's cup of tea)
I've been working a lot in EQ7 and playing around with different color variations, which is where I originally came up with this warm color version on a dark Essex linen background. I think it really takes on a totally different look, don't you?
So, from there, I thought it would be fun to see what the same mini looks like in cool colors... hmmm, I think I might be onto something here. The advantage of such a program, is that it's so much fun working with your stash fabrics without making a mess!
My Jeweled Kaleidoscope quilt is set to release October 12th, so stay tuned for more projects from my first quilt pattern!
Linking up this week to Let's Bee Social
Did anyone ever tease you in school? We've all been teased, and when it happened it wasn't always fun... but sometimes the person that did the teasing might have done it because they actually liked you. Pause... hmmm, with that being said, what do you think about just a little teasing today? I'm certainly hoping that this is the kind of teasing that you like!
I am in the home stretch of completing my first pattern and hope to share it next week! (eekk!) On such an endeavor, there is always so much behind the scenes things that have to be done before hitting that official launch button. On one hand it's a great feeling of satisfaction to be so far, but what that actually means is that I have been on the computer a lot more than at the sewing machine these days. On the plus side, my EQ7 program and I have gotten to know each other quite well, but as with all relationships, there are some days that you like each other and some days that you don't.

This is my first quilt to be quilted by someone else. Just look at the amazing quilting that Iva at Schnigschag Quilts and More did on my quilt... absolutely stunning, don't you think? Another first is that this is the first backing that I have not pieced. Somehow when I thought about how I wanted to finish this quilt, there were no questions asked... this Tula Pink "Freefall" wideback fabric was the ONLY thing that in my mind was the perfect fit.
So, for the
official status of things: Quilt is quilted? - check. First draft is
finished? - check. Paper pieicng templates finished? - check? Binding
and photos are planned for this week and I still am working on some shop
issues... I can see the light at the end of the tunnel... can you?
Linking up to Let's Bee Social.
Since sewing and quilting is a hobby for me, I've actually approached it as something without boundaries and deadlines... you know, just letting it happen. I'm not exactly an organized mouse... in fact, I fall under the chaotic creative category. One cannot imagine how hard those of us who fall into this category have to work to bring structure and planning into things.... but even with that being said, I recognize the benefits of a plan, which is why I've decided to join the 2016 Finish-A-Long. It made it easier for me to divide things into quarterly goals and then yearly/ongoing goals.
Quarterly Goals:
1. Last year I joined A Quilty Circle of Bees, a new quilting
bee with other German speaking members. For this month, Daniella picked blocks for an Amsterdam quilt, inspired by this version. Knowing that if I don't start on a
project immediately, I run the risk of procrastinating and missing my
deadline all together, I have made it my Bi-Monthly Goal to finish the
blocks as soon as they are announced. This one can already be checked off this quarter's check list!
2. If you've been around a while, then you might have seen bits of my mini mini craze... well, I have just one more to make, and it's long overdue. Tracy made these two beautiful mini's for me, and her story behind them is so beautiful and touching. I ran into a few snags while working on hers, but now that that the holidays are over, this is top of the list!
3. My Modern Beauty table runner is one of my "basket projects", which is meant to fall under the slow stitching category, but I'm in the home stretch of finishing the orange peel appliques, and just need to connect it and quilt it.
4. With my Farm Girl Vintage quilt,
I'm just a sashing and border away from being ready to quilt. I have contemplated
waiting to quilt a couple of projects all at once, but I suppose one thing at a time might be a smarter choice.
Yearly/Ongoing Goals:
1. When I started my Facing East quilt, I never considered it realistic to finish in a year. I actually wanted to start small with just a few blocks to test paper piecing to even see if I liked it... well, needless to say, 22 blocks later, I think it is sufficient to say, that I am smitten with the technique. A pieced top, including inner circles, is my end of year goal. This one will probably go to a longarmer.
2. My Alison Glass Butterflies project is another "basket project", which I started with no real plans in mind. It got shifted to the backburner because I wasn't sure how I wanted to finish it, but it's coming back out again this year!
3. This one goes back a bit. I have one side finished, and then I ran into unbelievable design issues with the second side. Needless to say, it's time for a Super Tote finish!
4. A new project that I am calling "Penny's Quilt" is an idea that was inspired by my Scrappy Windmills quilt post. Right now, I have a few sneak peeks on my Instagram feed, but I want to knock out a few other things before I do a full introduction and explanation of my concept.
5. Santa was kind to me this
year with the well known and highly praised EQ7 quilt design software.
There's a lot to learn, so this is an ongoing learning by doing goal
that I hope to have mastered by the end of the year.
I'm sure that there will be plenty of other things to work their way onto this list, but having this in black and white is a pretty good motivation for me to make things happen.
Have you linked up of a Finish-A-Long before? Did it motivate you to finish those UFO's, or where you distracted to work on other projects?
Linking up this week to WIP Wednesday, Let's Bee Social, and for the first Time 2016 Finish-A-Long