I've been taking my summers pretty slow, as you might have noticed... and you too? If you've been following me for a while, then you know that summer means it's time to pull out my Chuck Nohara blocks. Since this has been such a long, and on going project, you might think they've landed on the long forgotten WIP pile, never to be pulled out again... quite the contrary!
My aunt always
reminds me that making quilts is not about seeing how many quilts you
can finish in a year, but about enjoying the process. When I'm on an everyday schedule, it seems that I don't find the time to work on highly intensive applique blocks.
Usually when I take an applique project somewhere to work on it, I don't have my sewing machine with me. And just the opposite, when I am using my sewing machine, I usually am not thinking about applique. I've actually had several shapes from this block finished, but just needed to add the simple stitching
... and since I am keeping things slow this summer, I am also keeping things short, so I'll see you on Sunday for the #summerstacksundays with the theme "soft summer".
Recently I shared one of my favorite, lesser-known, and all-too-often-forgotten-about quilting techniques. If you were to ask me, I would tell you without a doubt, that reverse applique should get more recognition than it does. Don't stop reading there, or snub your nose, just because it has the word "applique" in it... I promise, it's not a dirty word like some might like to label it with quick judgments.
But I've actually noticed something a lot recently - I don't have enough fingers and toes to count how many times I have seen a quilt, and thought to myself - "wow, one could have cut corners, shaved off hours of drunkard's path, curved-piecing sewing, and still ended up at the finish line in half the time... just by using reverse applique instead!" Just stop and ponder it for a bit.
As part of my color theory class at Nadelwelt, I ended up making several quilt blocks to use as samples. I was inspired by a simple Baumhaus-influenced art print that I found, and decided that it would be perfect as an applique block. What starts out as one block, grows to two, well, and you know the rest...
I thought that straight line quilting was quite fitting to the simple geometric shapes. I finished the back with a really nice linen in fuchsia that I had picked up several years ago at a bargain price. I love mixing linens in my quilting projects.
So, have you
done any reverse applique projects? What has been your experience? ...
do you love it or are you scared of it because it's "applique"? Then let
me challenge you... see if you can spot a couple projects that reverse applique would be a
faster substitution than pieced curves... you might actually end up thanking me later!
I recently had a visit from a quilty friend for the weekend, and it seemed as if I was all over the place with my projects... somehow, I wasn't really motivated to work on the things that I was "supposed" to work on... and I actually pulled out a project that had been a long time in the works... for a long time.
When I first started this Brimfield block, I didn't have a specific plan, but had thought to possibly make a little pillow for my living room. Since I already have several quilted pillows, I quickly concluded that it was perhaps a little predictable... and even overdone. By the time I had decided to turn this single block into a stool, the next step was to actually find a stool.
Anyone who is keen on vintage shopping or furniture refurbishing knows that you might have a general idea of what you are looking for, but may not find it on the first couple excursions. Sometimes you find the most when you are not looking for something specific.
Last year on the way home from Nadelwelt, I made a spontaneous stop at a little antique place that was on the side of the road. I was excited to find some comic books for my boys, a few vintage cigar items for my husband, and yes, you guessed... a stool for me!
But as you can imagine, my block had been basted, half quilted, and put on the back burner by then. It's not always easy to pick up a project that has been packed away for so long, dust it off, and jump back in.
Because I had to custom fit the block to the stool, you can probably imagine how nerve wracking it was to cut this block into a circle... if the measurements slightly off, then I would have to scrap the whole thing - only one-chance-cutting here. Sewing the inset circle was nothing new to me, because I did it often from my purse-making days... and give me a staple gun, and I am a happy girl.
... and just like that, to my surprise, I was stapling away for a weekend finish!?! I was super please how well the upholstery fit. So the only thing left for me to do now, is kick back and really put my feet up.
Pattern: Brimfield Block, from Brimfield Awaking
Fabrics: Anna Maria Horner, Alison Glass, Heather Baily
Background: Essex Linen
After you work so intensively on a project, and the project goal comes and goes, it can be a little difficult to find your way back into a normal rhythm. After returning from Nadelwelt with all my lists checked off, it's been a challenge to figure out what to work on next. I have several deadlines coming up, so what is the best way to get back into your normal flow... work on something completely different, right?
It's no secret that I love applique, but I especially love reverse applique. There is so much potential for this not as frequently used technique. These leaves are actually for three different projects, and since I love the result so much, I had to make a set of blue leaves too... who says that leaves have to be green?
It's that time of year where blueberries are strawberries frequently make it to our dinner table, and evidently they've also made their way to my sewing room too!
I've always loved the looks of wild or mock strawberries... such tiny and petite berries that look good enough to eat. There has been a little discussion recently on Instagram whether or not they are edible.
In any case, edible or not, this project is still growing and developing. (no pun intended) Just a short and sweet sneak peek for today because it's time to get back on track.
Ask any professional, tradesman, artist, or handcrafter... having the right tools for the job really makes all the difference. One of my most asked questions about my applique, is "how do you get the edges so crisp?"... simple, by having the right tools. I've shared a lot about my favorite starches, irons, paintbrushes,etc. for the starch applique method (found here), but one important tool that is not to be overlooked is a proper pressing board.
While one could argue that a regular ironing board works just as well, let me explain why I use a pressing board instead:
- A really hard surface, combined with the proper starch and a high heat mini iron, really IS what gives the desired clean and crisp edge.
- The high heat of the iron and the spray starch have a tendency to slightly "burn" and brown your work surface over time and high use.
- With that being said, it saves your regular ironing board cover having to be frequently replaced.
- Re-covering a pressing board after it's been soiled is a breeze!
- Lastly, it's small and easy to transport.
Have I convinced you now? So, here's what you'll need to make your own pressing board:
- Cotton Canvas 16 x 20 inches. (ca. 40 x 50 cm)
- Cotton Batting 16 x 20 inches. (ca.40 x 50 cm)
- Plywood Board 10 x 14 inches. (ca.25 x 35 cm)
- Craft Felt Piece 10 x 14 inches. (ca.25 x 35 cm)
- Staple Gun & Staples
- Spray Glue
Layer the cotton canvas, then the cotton batting, and finally the plywood piece on top, as shown in the picture above. Begin on the long side of the board and pull fabric and batting to the back side. Tack with three staples. Rotate the board to the opposite long side, pull fabric taunt, and tack with three staples. Fabric should be taunt but not stretched. Repeat steps with the remaining short sides, but do not staple to the end yet.
After all four sides have been secured, pull the corner batting piece to a point, and cut at an angle for a mitered edge. Repeat for the remaining corners.
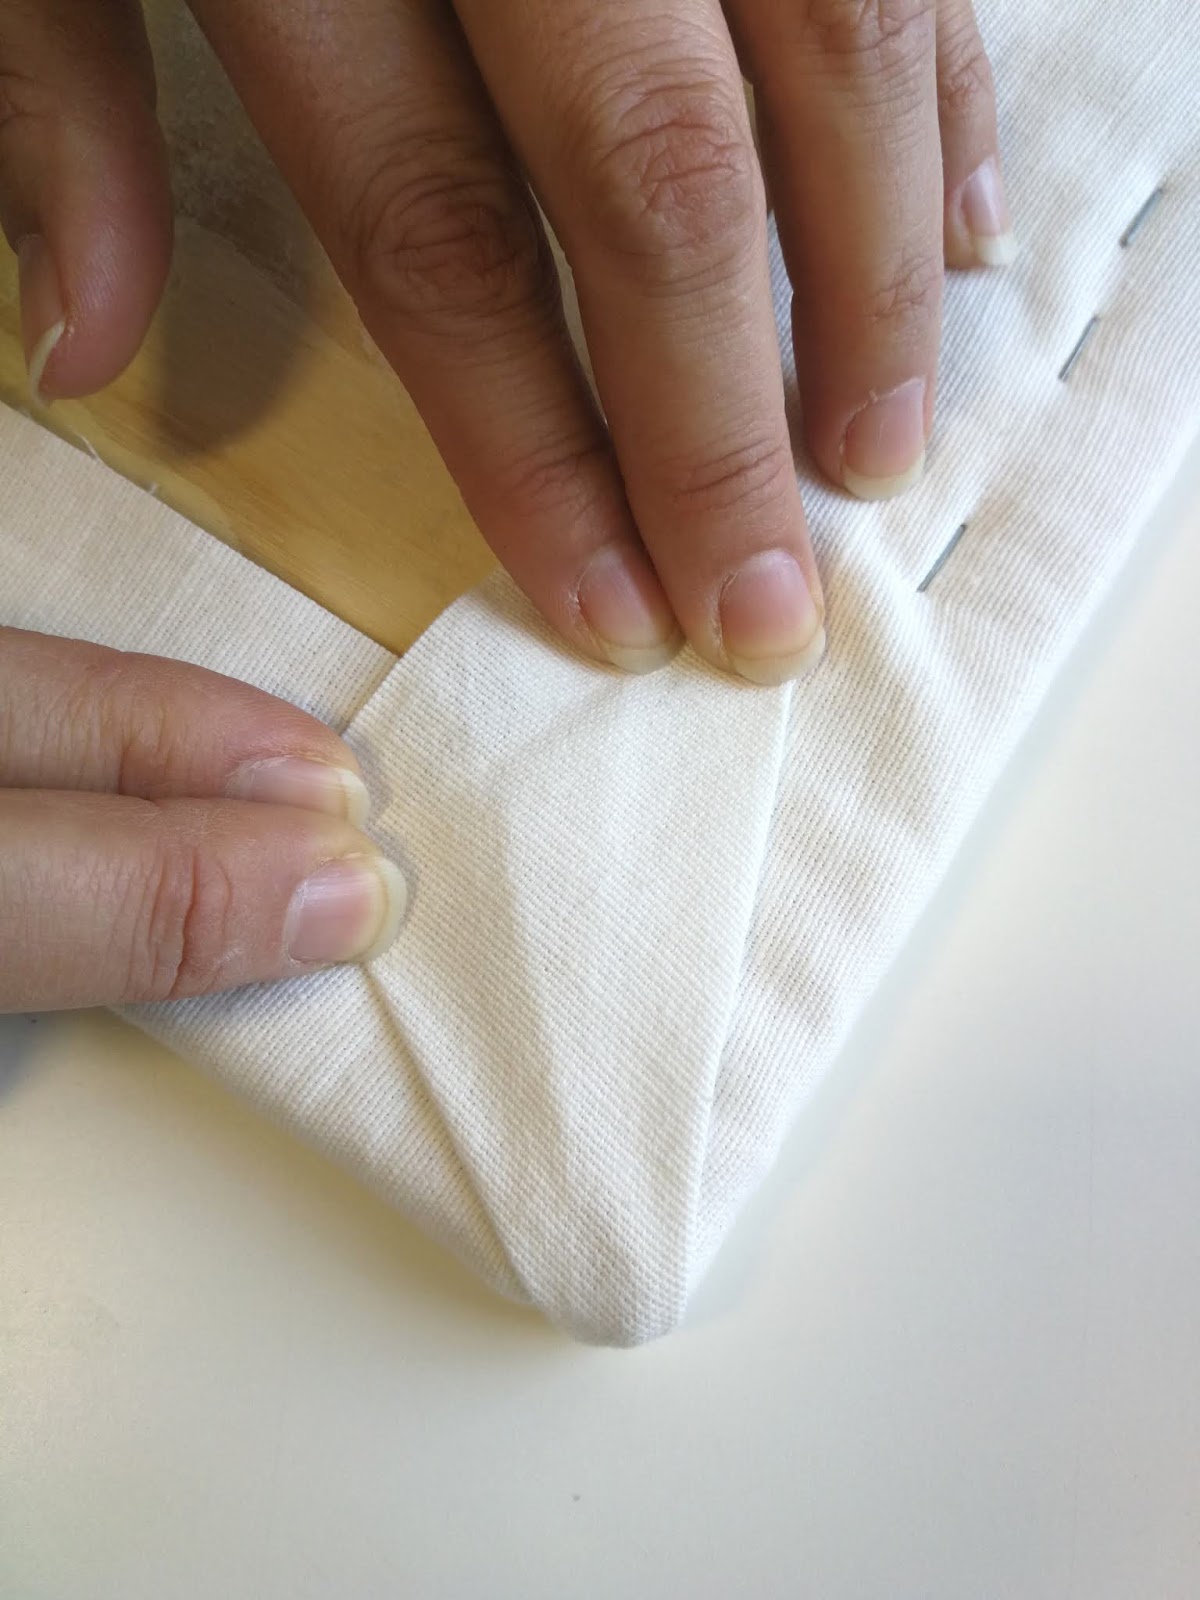
Continue stapling along one long side of the board, stopping 1 - 2 inches from the corner, and repeat with the short side until there is a small "dog ear" left as shown in the picture below.
There are two ways that you can finish the corners, and it is simply a personal preference. The first is to pull the fabric down at an angle. The second is to simply fold it over as shown below. NOTE: Some prefer to also cut out the corners of the canvas fabric to avoid bulk, but my preference is to leave the fabric corners in.
Tack the corners in place. Repeat until all corners are finished. Cut any excess fabric as desired.
Finally, spray a generous amount of spray adhesive/glue to the back side of the felt piece. Position it on the back of the board. This prevents scratching from the staples when working on a table or other sensitive surface.
Now you're ready to go! Be sure to check out my YouTube channel for starch applique how-to videos, including tips on my favorite supplies!
These last weeks have been all about getting ready.... getting ready to print my latest pattern, Whirly Girl... getting ready for my upcoming class in Hildesheim... getting ready for both of my Nadelwelt classes... getting ready for my next pattern release... not to mention finishing the quilt top for the pattern after that... wheh!?!... and what do I have to share? Not much... yet.
Well, how about we start with what's NOT under wraps? This weekend I'm teaching another starch applique class, and for those that have never tried this technique, I usually recommend starting out with a simple block that covers a little bit of everything. Since circles and leaves are a staple in many applique blocks, it's the perfect place to begin.
Once those are mastered, it's time to move on to bigger and better things. A simple heart is an ideal shape to begin with because it addresses the issue of an inward curve. Those are the points that can sometimes be tricky to handle because there's just not much fabric to work with.
Last fall, I made a sample block to demonstrate the starch applique technique when I taught a weekend course with Patch-Yard. She made another appearnace just recently in Patchwork Professional, where I did a little how-to "workshop" along with the magazine feature.
Since I will demonstrate this block yet again at Nadelwelt, I thought it might be time to make a plan for all those sample blocks, not that I get stuck with a bunch of random, orphan blocks that only get thrown into the WIP box later.... so I started a little fabric pull.
Thinking about it in hindsight, it might have been better to have a plan before I started - connecting these two blocks to each other is not the easiest divide to cross... not to mention that is a color combo that is way outside my comfort zone.
So, now I'm making lemonade out of lemons!
Last week was an absolute flurry of things to do. At some point in preparing for my starch applique class with Patch Yard, I realized that the only thing that I was missing was a sample to deomonstrate the reverse applique technique. A simple circle is perfectly acceptable, but would have needlessly been tossed into the orphan block bin... and who wants that?!?
Recently I decided to try out a few classes on Creativebug, and was excited to see that the Anna Maria Horner "Folk Flower" block was among the classes. The block itself is simple enough to figure out on your own, but it's always interesting to see the thousand ways that you can ultimately end up at the same end goal.
Sewing by hand never was my thing, and never will be... but bring in the word starch, and you are talking about a whole other ball game for me. All in all, I still appreciate seeing a variety of techniques used in quilting. For me, using reverse applique with starch applique, is like the universe aligning.
On my blocks, I decided to use an appliqued bias tape strip instead of piecing it. I much prefer the bias tape to sewing thin strips, that often have the tendency to be a little wonky because of their small size. For the background, I am using some pretty strongly patterned prints, which are a far cry from my usual low volume backgrounds.
I'm just sure that I can come up with some kind of fun project for these leftover circle cut outs, don't you?...
These blocks were the perfect choice not only to demo, but to start a project that I've already had in the back of my head for a while now... I just love those killing two birds with one stone moments. So, how about if I leave you with just a few impressions from the class?