I've been taking my summers pretty slow, as you might have noticed... and you too? If you've been following me for a while, then you know that summer means it's time to pull out my Chuck Nohara blocks. Since this has been such a long, and on going project, you might think they've landed on the long forgotten WIP pile, never to be pulled out again... quite the contrary!
My aunt always
reminds me that making quilts is not about seeing how many quilts you
can finish in a year, but about enjoying the process. When I'm on an everyday schedule, it seems that I don't find the time to work on highly intensive applique blocks.
Usually when I take an applique project somewhere to work on it, I don't have my sewing machine with me. And just the opposite, when I am using my sewing machine, I usually am not thinking about applique. I've actually had several shapes from this block finished, but just needed to add the simple stitching
... and since I am keeping things slow this summer, I am also keeping things short, so I'll see you on Sunday for the #summerstacksundays with the theme "soft summer".
Applique takes time, and sometimes the pressure of the social media world of "I must post daily inspiration", never takes into consideration that slow stitching is supposed to be just that... slow.
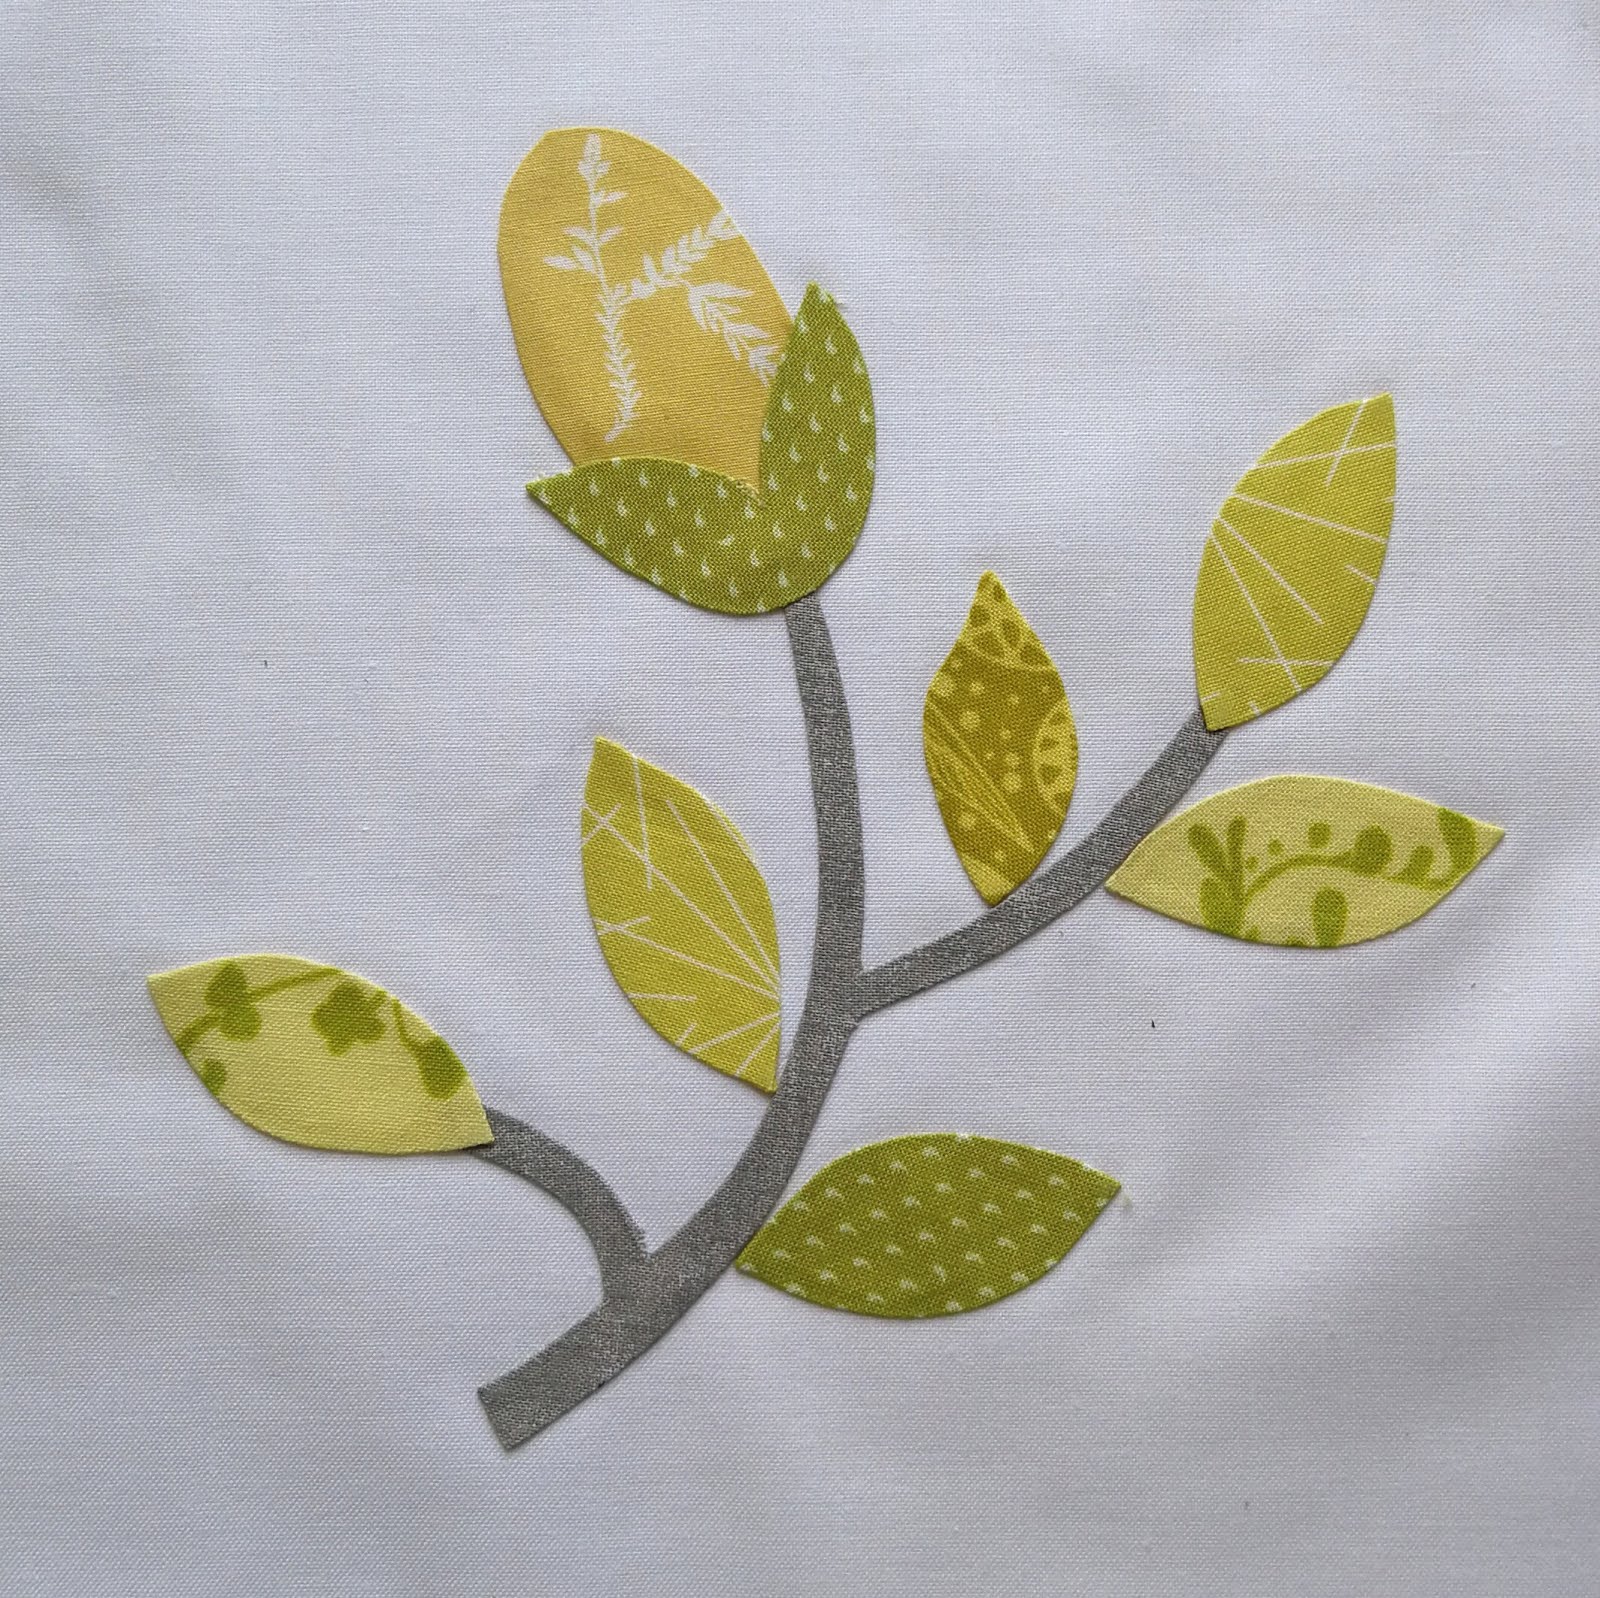
Block 463
When you see me pull my Chuck Nohara blocks out, then you know that it is vacation time, or I am at least at a point I am slowing down. Since I was away from my sewing machine for the whole summer, I had to at least have a little something around for my itching fingers.
Block 620
The last time I posted any real progress on my Summer Garden project was last year... and let me just say that this is not a project that I plan to finish any time soon. My aunt, who is a seasoned quilter, is always reminding me that it's not about turning out one quilt after the other, as quickly as possible, but about enjoying the process... a good reminder for all of us, don't you think?
Block 696
But I am actually ok with my snails pace progress... and have no apologies for taking it slow. Even a garden never grows overnight, and those stop and smell the roses moments make it worth it.
Block 602
Somehow, every time I think about my Summer Garden project, the nursery rhyme from Mother Goose always comes to mind...
Mary, Mary, quite contrary
How does your garden grow?
With silver bells and cockleshells
And pretty maids all in a row.
Wanna slow stitch with me and are in the Hamburg area? Then be sure to check out my previous post because I will be teaching a starch applique class.
Some of my bee members like to make fun of me that by the time I deicde on a quilt block, and make up a couple test blocks, that the quilt is almost finished. Well... not quite. Yes, I've made a good amount of progress on my yellow quilt, but am no where near being finished. My bee members will be pleased to know that I am stopping with stars now, and passing the torch for them to carry.
As I had mentioned last week, it is my intention is to keep the applique blocks fairly simple and not get slowed down by such labor intensive blocks... you just can't find any simpler applique shapes than stems, ovals, and orange peels. I've always been really drawn to crossing applique designs.
Here is another Chuck Nohara mix up... I used the stem template, but instead of the multi-pieced flower as in the original, I used simple leaves with a oval accent.
I love the curved crossing stems from this Chuck Nohara block... see if you can spot the original design from my summer garden blocks. No worries, I've not forgotten this project... it's coming back out for summer! It is my travel applique project, and I can't wait to work on it again.
What are you summer sewing plans? Take it with you applique? EPP? or lifting a cold drink as you relax in the garden?
If you're a quilter, I'm sure you can identify: that package of long awaited fabrics just arrived... you know, the ones you've been drooling over since Quilt Market, which at this point seems like an eternity ago. (and in the world of quilting, technically it was) You only have about thirty minutes to sew, but you're at a place with all of your other projects that take more than 30 minutes just to get started... what do you do?
Ok so, I suppose that it's obvious that I like to come up with creative ways, week to week to justify why I just "had" to start another project... but could you resist a new stack of Anna Maria Horner fabrics either? I didn't think so.To further justify things (at least in my head) working on just a "little pillow" means that I'm not going to be off track for long... maybe that's why I make so many of them!?!
I decided to enlarge one of the Chuck Nohara templates so I could make a 20" pillow. So far, I've only made 8" blocks, but things always come together a littler faster when you are working with larger shapes.
This
was my first time installing a zipper closure... definitely more work,
but I love the end result. I found this tutorial on Pinterest, and of
course the Internet is peppered with all kinds of DIY zipper tutorials.
Perhaps
you've noticed a new fabric in this project? When I was looking for a
background fabric, I of course went to my standard chocolate brown Essex
linen that I've used in so many of my other pillows, but it was just a
little too intense in it's contrast. Then I remembered this fabulous
wool that I purchased a long time ago for another project. I love the
little flecks of color throughout, and I thought that if linen works
with such a nice result, then why not wool?
What about you, do you like to mix other fabric types into your quilting projects? any favorite experiences with wool?
How does the familiar saying go... "all work and no play makes Jane a dull girl"? If you happen to be a crafter like I am, and there's more time spent behind the computer screen than the sewing machine, then it's easy to see how one can hit that "I can't take it anymore point!" because of lack of creative time.
I've got a lot on my list these days that makes me feel like I am permanently parked behind the computer... making final corrections on my Lovebirds' Garden pattern, preparing presentations for two courses at Nadelwelt, adding five mini patterns and working on the Home Sweet Home applique sampler pattern... just to name a few.
Sometimes I need those 30 minutes here or 30 minutes there projects to give me the sense that I am still crafting despite the big to-do list on my desk. For me it's better to be working on something rather than nothing at all because I don't have the time to "think" myself back into a project.
Upon
reflection, I suppose I have so many smaller in-between projects
because I'm usually at that step in the quilting process with my larger
projects where they cannot be easily started or stopped. Once you've put
your
project to the side because the kids are hungry, it's the end of the
work day, emails need to be answered, or whatever the case, by the time
you figure out where you need to start again, there is something else
that need attended to.
So here's my "in-between" breather project ... a little starch applique Chuck Nohara project with the new Anna Maria Horner fabrics. Oh, come on, like you could stay away from a freshly delivered fabric package?
Do you get stuck because you only have 30 minutes to sew, and no start and stop projects in the works? Maybe Mell can help you get motivated with her #30minsewingdaily challenge.
Do you have a specific and defineable quilting style? Can people look at your work and identify a follow-the-thread color scheme? a design style? perhaps that certain something that makes it obvious who you are?... like a Tula Pink, Red Pepper Quilts, Bonnie and Camille, or a Carolyn Friedlander? I would say that each of these designers have a very distinct and easily identifiable style, and there's no questioning whose work it is.
Despite the fact that some of what I do could be picked out in a line up, it does feel like I am not particularly married to one specific style. My heart beats for color, which I assume is more than painfully obvious, but there is something about the traditional that beckons me to also put it on the center stage. My quilting wall this month pretty much sums up what I mean.
My Eads quilt and Summer Garden blocks could not be any more different than day and night, black and white, potato and potahto... well, you get my drift. I started the Eads quilt as my attempt to distance myself from the direction that I normally tend towards. I wanted to do a quilt without a light or low volume background. Somehow this modern and graphic quilt appeals to one side of me.
... the other side of me craves a solid never-let-your-fingers-be-idle project, but my Summer Garden is the slow growing kind. No hurries, and no worries. I've always been attracted to and fascinated by traditional applique quilts, so this seems to somehow fit me too.
I was able to add these three sweet blocks recently and it was the perfectly packed project for our quilting group this past Saturday.
Block #481
Block #487
Block #575
What you don't see on my design wall right now are the pattern writing and other secret sewing projects that I have in the works... all in good time, right?
Linking up this week to Let's Bee Social.
It's great to have another quilter in the family that you can simply "talk shop"... favorite fabrics, projects in the works, proud finishes, and a variety of techniques, tips, and tools. On my recent visit to the States, I was able to catch up with my aunt, and let's just say that there was a flurry of conversation that would put any non-quilter to sleep. Of course the topic of applique came up because I had taken my Summer Garden blocks with me to work on. When I asked her about starch applique, knowing that she is a master appliquer, I was puzzled by her hum-ho response... in my opinion, starch applique is THE best thing since sliced bread... how could she not love it and not want to applique everything with it?!?
So I've come up with my 10 BEST starch applique tips to pass along:
1. Let's talk STARCH - make sure it's PURE (starch tips for Germany, see below)
Let's just start with NOT ALL STARCH IS CREATED EQUAL, and I found out first hand why my aunt had been so indifferent to the starch applique method. With that being said, here's what I found when testing different starch brands.
- Faultless Heavy Starch was the first starch that I tried and I was not at all impressed. It really felt like work without the result of a nice, clean, crisp edge. This might work beautifully for ironing shirts that are not stiff, but you can leave it on the shelf if you want to applique.
- Niagara is the brand that was the most well-known to me. It was a small tick better than the Faultless brand, but it still felt like too much work to get too little results.
- Sta-Flo from Purex (found at Wal-Mart) is a concentrated liquid starch, and is my top pick for starch applique. Despite the fact that you might be tempted, DO NOT dilute the starch with water... not even a little smidge, you must use it PURE. One advantage is that this already comes in liquid form and you don't have to wait for the spray foam to liquefy. Sometimes there are some light, flaky "scales" left on the back side, but those can be lightly scratched of with the fingernail. They are definitely not bothersome enough to avoid this product.
- Additional Notes: Faultless also offers a concentrated liquid, but I have no comparisons since I've not tested it. The label suggests that it is also for crafts.
STARCH IN GERMANY (skip over this part if you're in the US)
- Sprüh Stärke von Edeka is my favorite and top pick of the German brands that I've tried. It gives a really crisp and clean finish, there are no flakes, and it has a nice hold. A+ for this brand that does starch applique the right way.
- Denk Mit von DM seems to be the starch that is closest to my favorite Edeka brand. It is even similar in smell, but it is listed to also include "Hilfsstoffe" which is missing from the Edeka brand.
- Domol von Rossmann gets a good rating, but it is not as good as Denk Mit or my favorite Edeka brand. It is very foamy when you spray and evaporates to a thinner liquid than the above two. You do have to work more to get the shapes to lay flat with this brand.
- Dalli Duo (I think I found this by REWE) I actually bought this by mistake not noticing that it has an extra "Bügelhilfe" in addition to the Sprühstäke, which explains why I had the same poor results that I had with the two US brands, Faultless and Niagara above. These extra additives give this brand a poor rating from me.
Now that you you've learned more than you'll ever need to know about starch, there are a few other tools/notions/tips that you will need:
2. Make yourself a PRESSING BOARD I find that it's nice to have a portable surface that you can use to finish your applique shapes. Because of the small size of a pressing board, you can use it outside, in the car, on the couch, or even by the pool (trust me, I did it). Another benefit is that you save your regular ironing board cover. Between the really hot iron and the starch, It's actually quite easy to get your board a little messy. Check out YouTube for tutorials.
3. Use a STIFF BRUSH for "painting" the starch on At first I had tried a softer bristle brush because it's desirable for painting, and I assumed that it would be the same for applique. What I found was that when the brush was more stiff I could apply in a more controlled way without drenching my freezer paper shape.

4. That iron is REALLY HOT! - Pay Close Attention When reading reviews about mini irons, there are two major complaints that I've noticed... firstly, that the iron is hot, and I mean REALLY hot. This is where I think to myself, well, duh, but it has to be hot for the most desired results. I think if one is aware how hot the irons are, it's easier to pay attention. The second major complaint is that the stand is not that stable. Somehow manufacturers just have not come up with a good solution for this, but it's a flaw I'm willing to live with considering the end results. I was able to compare two different mini irons because I was not able to take my German mini iron with me to the States (different cable/voltage)
- In the US I tried the Clover Mini Iron. With Clover being a brand that I am already familiar with, I had high expectations. Even though the iron has a high and a low setting, I found that it wasn't quite hot enough, another complaint that other reviewers had given. It was sufficient, and I would still give it a good rating, but it didn't completely meet my expectations. On that note, it IS very important to get a mini iron with a high and low setting.
- The iron that I use in Germany is a Komerci Mini Iron. This was a gamble for me that paid off. I was unfamiliar with the brand, but found it to be my favorite of the two. The tip is slender and I assume it holds the heat better since the head is thicker.
- Additional notes: You can also use a regular or small travel iron, but just remember to keep the steam OFF.
5. FREEZER PAPER is a quilters best friend.
Freezer paper is an appliquers best friend (and quilters too).
For starch applique it's best to layer your freezer paper for stability.
You can double up, triple up, or more if you want. Just place the freezer papers on
top of each other shiny sides down. The beauty of it is that the
shapes can be reused. TIP: If
you are tracing shapes from a template, I find that it's best to draw the shapes on a
single sheet of freezer paper before ironing on the second layer. TIP: Even though you might have 20 leaves
in one applique block, I usually
make at least two leaves despite the fact that they can be re-used, so I can work on several shapes at a time. (If
you are in Germany, don't worry, you can find Freezer Paper on
Amazon... and the Reynold's brand is the way to go)
6. Remember to THINK BACKWARDS. If
your flower template is pointing to the left, and you simply trace it,
when you have your finished applique shape, it will be pointing to the
right... so you have to think backwards. Just to keep it real, you can see how I made a mistake and traced this stem on the wrong side...ooops.
7. Take a NUMBER, please As I trace the applique shapes, I put a number on the paper side of the freezer paper shape that matches the block number because you may want to use them again OR just in case they get separated from the group you can find where they belong. If there are, for example, a lot of leaves in a block, I might also label them R, L (right, left) T, B, M (top, bottom, middle), etc.
8. STAY ORGANIZED My mother would be quite shocked that this statement actually came from my mouth, but she's right. Find a way to sort and store your applique shapes so you can pick up and leave off as you need to. I found a nicely bound, clear pages folder/organizer, which means that the applique shapes that I have started can stay filed with the block template. I can easily flip though the book when planning the next block.
9. Keep your bags packed - Do a SCRAP PULL When working on an applique project, it really helps to have all your scraps sorted in advance and in one place. Store them in a box, bag, a basket, or whatever you like so that you always have a project packed up and ready to go.
10. Pick the STITCH that fits YOU best Everyone
has their favorite method for applique. While many prefer hand
stitching blocks, there are those of us who prefer the machine stitching
for either patience or health reasons. For a straight or blind stitch on
the machine, I like to use an invisible thread. The beauty of an invisible thread is that you don't have to change the top thread with each color change. It's not necessary to use invisible thread in the bobbin, but it is very important to
remember to adjust your thread tension.
Never tried the starch applique method, but you'd like to? Check out this video from The Fat Quarter shop and get started.