One of the things that I think could possibly trip people up when it comes to a reverse applique project, is that you have to essentially cut a hole right in the middle of your project... did you ever have your mom reprimand you sternly for doing the same with your construction paper art projects?
Well, I say, that if you already had those natural tendencies when you were young, then perhaps you were onto something back then, so shake off any guilty feelings and charge boldly forward... no holding back!
Just because reverse applique requires you to cut a hole out of the middle of your project doesn't mean that you have to waste it... not with my Waste-Not, Want-Not pillow! Last week I shared my Circle Around pillow, which is a reverse applique pillow, and with all those pretty cut-outs, you didn't think that I could throw them away?
So, I simply made a freezer paper circle template that was slightly smaller than my cut-out, a little starch, a little ironing, and viola... pretty finished circles to applique on a quilted background. This time I did the quilting before I finished the applique, even though I usually quilt after my shapes are appliqued on.The circles are finished with a blind stitch, using an invisible thread from Aurifil.
Ahh... things are really warming up for summer aren't they? Have you relaxing and putting your feet up too?
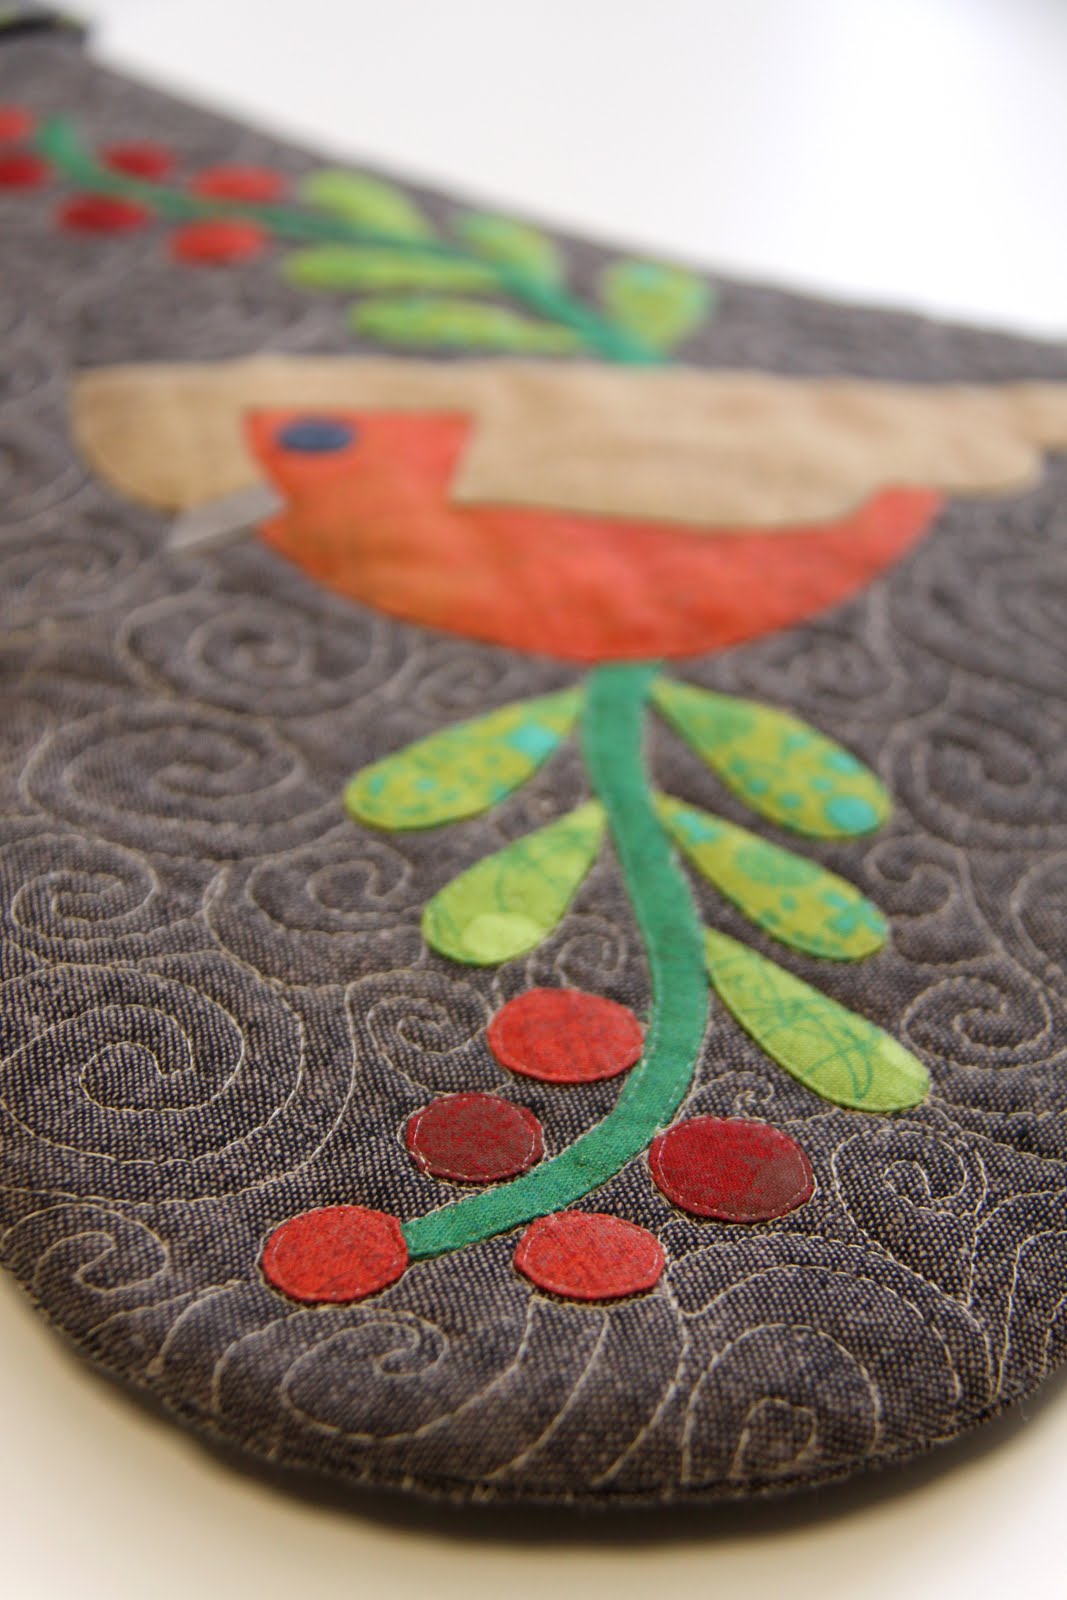
If you stopped by today because you know that Wednesdays are my regular posting days, then perhaps I should let you in on a little something you might have missed yesterday... the release of my Christmas Snowbird applique template - now available in my Payhip shop!
My original plan was to release a stocking pattern including the applique templates, but since there are already so many great free tutorials out there (like this one), I decided to simply offer the applique templates, and let you come up with your own plan. Yesterday I shared a few inspiration ideas for possible projects, but today I get to share my own finished Christmas Snowbird project...
I think that perhaps free motion swirl quilting is making its way into the "signature style" category with me, but I love the ease of the movement while quilting. I used Auriful 2326 on a dark espresso Essex linen because I love the contrast and that the quilting shows off more than my standard - quilting takes the back burner style.
I've had this Cori Dantini fabric for a while, just waiting for the right project to come along... does that happen to you too? You have a fabric that's been in your stash for a while, and all of a sudden a project that you work on lets you know that there simply IS no other fabric than "this one" for the finish?
I'm really excited to see projects popping up here and there with the Christmas Snowbirds... what does your holiday sewing to-do list look like this season?
As a general rule, I tend to avoid highly quilted projects. I think in part because sometimes more is just, well... more. I'm a fabric, color, and print girl, so I'm naturally inclined towards simplicity in quilting and letting those elements shine. But secondly because I've not reached the comfort level that I would like to "over-quilt" a project, at least not on big ones anyway. With each new small project that I've taken on recently, I've decided to push myself when it comes to free motion quilting... and with my latest "Lovebirds" bonus project, I really wanted the quilting to go beyond my usual "keep it simple" mantra.


Quilting designs are not always as obvious to me as I would like them to be. I have several quilty friends, that immediately see a quilting design when they get ready to sit down and start quilting. Actually it was my husband that encouraged me on a few of the designs, and voted for favorite motifs. Like the pebble filled pomegranates and simple feathered bird wings...
... I'm thinking that I might like to revisit these simple curves to embellish my favorite orange peel designs.
Hmmm... ask me if I'm brave enough to go this dense on the big one? I may just have to get back to you on that one. Any stories of quilting bravery to share?
With two boys that are fairly close in age, I find that if I do something for one kid, that I have to do it for both kids... so this past Christmas I really wanted to give the boys something that I had made for them. I love paper piecing, and my oldest guy loves pirates... so why not combine the two? For the last three years his birthday parties have been about eye patches, treasure maps, and of course treasure hunts. Ahoy, Matie!
Pirates don't exactly fit to his tractor/automobile themed room, so it was a bit of a stretch, but I knew that this guy would flip over the dangerous pirate ship that was sailing the seven seas, (free pattern found here) and I would simply be happy that it somewhat matches his room.
I'm finding more and more that I actually enjoy spiral quilting, and have used it in some recent projects. I'm still working on feeling comfortable doing it, and practicing on smaller projects really helps.
In addition to the decorative pillow, both boys desperately needed a few pillowcases. I still had leftover fabrics from both rooms, and made a few "burrito pillowcases" This is a really nice way to add a few decorative pipings, but still end up with nice finished edges.
I'm pleased to say that both of pillows were a big hit and I'm looking forward to when I can make quilts for them... I'll wait until they get a little older.
Linking up this week to Let's Bee Social.
While digging for fabrics for a project recently, I ended up stumbling onto a whole stack of leftover linen triangles from a pillow that I had made for my husband. Then the idea hit me that I could use them with the leftover scraps from my Modern Improv paper piecing pillow to make another coordinating pillow for my parents... but I wanted this one to just happen.
Am I the only who does this?: As I sat down to finish my husband's pillow I was
quite perplexed because I didn't have enough triangles to finish all the blocks... so, what did I do? Cut some more... of course. You cannot imagine how annoyed I was with myself to find out later that I actually had cut them (like I thought), but they had fallen behind my sewing machine where I didn't see them.
I suppose if they come to good use in the end, then it doesn't matter how they get there, right?
I first started out with a random color layout, but found it to be a little chaotic. When I grouped the colors and organized them a bit, it seemed to have a better flow. There have actually been several projects where it felt like I had just hit a roadblock, until I reworked the color organization.
I also let the shapes within the pillow dictate how I did the quilting by first following them, and then simply echoing the quilting in various widths.
As I've said with just about every improv project that I've ever done, it's an uncomfortable stretch for me, and I'm still left asking myself if I will ever warm up to it. I guess it's a little like eating broccoli... it's ok to try it every once in a while to see if you still don't like it.
What's your "quilting broccoli" that you have to keep coming back to, just to see if you still don't like it?
Linking up this week to Let's Bee Social.
I love the drastic transformation a quilt can make with just a simple fabric change. Dark backgrounds can give such a dramatic look, and my favorite go-to background that I seem to grab over and over again is my Essex Linen. These rich chocolate tones really make those brights pop, don't you think?
Don't you just love those kill-two-birds-with-one-stone projects? I wanted to work up a second colorway option for my Tiptoe Through The Tulips quilt pattern, which is to be released on March 15th, and still have something that I could use in my living room. I think this red chair is the most photographed piece of furniture in my house.
I'm not just finishing projects for my house, but hitting my goals list pretty hard for this year. Part of my general/ongoing goals has been to stretch myself with more free motion quilting practice. I thought that these wandering leaves were fitting to my pattern, and something different from the swirls I used for my last FMQ project.
Next up on my list will be the binding on my biggest quilt ever for my fourth finish so far! A king size quilt is a pretty big milestone for me.
Be sure to check out what my busy pattern testers have been working on so far under the #tiptoethroughthetulipsquilt hastag on Instagram... and again, be looking for the pattern release on March 15th!
Linking up this week to Let's Bee Social and Finish-A-Long 2017
Searching through boxes and boxes of packed away things, it feels like I can only find about half of my Christmas decorations since our move. It's always a delight at the beginning of the season to pull out all those hand made pillows and other sewn things to adorn our living space. So needless to say, this pillow finish comes at the perfect time in the absence of my missing holiday decorations.
This project actually came to be because of a couple sick days on the couch. I already had it prepared for my Denmark trip, but without those "forced" days down, I'm not sure it I would have finished it this year. I decided that a radiating quilting design would highlight the wreath and draw focus to the center text.
Notice a trend with all my Essex linen pillows? (here, here, and here) It's actually THE perfect fabric to compliment those rich, deep, warm tones that match our living room so perfectly.
Pattern: "Merry & Bright" by Minki Kim, as found in issue 40 of Love & Patchwork Quilting magazine.
Fabrics: Alison Glass, Carolyn Friedlander, Cotton & Steel, and various additional scraps. Essex Linen, espresso. Cori Dantin,i Seeds (backing)
Finished size: 20 x 20 in. (ca. 50 x 50 cm)
Quilting Thread: Aurifil thread Sand 2326
So, now that this is checked off the list, it's on to a couple present making projects... and you?
Linking up with Let's Bee Social and Scraptastic Tuesday
My Jeweled Kaleidoscope quilt pattern is now in the hands of my pattern testers, and I'm really loving seeing so many takes on the same block! Be sure to check out what's happening on Instagram (#jeweledkaleidoscopequilt)... everyone has their own signature style and favorite fabrics. Oh, by the way... did I happen to mention that my pattern comes in two different sizes and an optional version?
The pattern is also available in a 18" mini size, which is perfect for pillows, wall hangings, etc. This pillow is for my living room and I love it! This is not only the mini version, but also the optional version without the circle appliques. (I realize that applique is perhaps not everyone's cup of tea)
I've been working a lot in EQ7 and playing around with different color variations, which is where I originally came up with this warm color version on a dark Essex linen background. I think it really takes on a totally different look, don't you?
So, from there, I thought it would be fun to see what the same mini looks like in cool colors... hmmm, I think I might be onto something here. The advantage of such a program, is that it's so much fun working with your stash fabrics without making a mess!
My Jeweled Kaleidoscope quilt is set to release October 12th, so stay tuned for more projects from my first quilt pattern!
Linking up this week to Let's Bee Social
If you've followed me on any of my quilting journeys you know that color is my favorite part of the quilting process and feels easy to me, while the actual quilting part is what I struggle with the most. Since my Jeweled Improv Mini is my first improv project, I really was a little clueless where to even start quilting. Sometimes balanced designs give you little hints, but
there's nothing symmetrical here!
Somehow the obvious choice seemed to be to shadow the points: Obvious, but perhaps a little too obvious... predictable was not what I wanted on an improv project. Instead I really wanted to challenge and push myself, not to mention avoid the downside of having several points that would have to be backstitched since this gal doesn't bury threads!
In the end, I actually did let the design dictate the quilting to me. I started by making the white open V at the bottom of the quilt my starting point, and filled it in. Once the radiated V was in place, I changed the direction of the quilting lines into an L shape on both sides.
I really wanted to use my variegated threads that I had purchased a while back (with no particular project in mind), but I decided that to use it all over might be too much and take away from the overall design. I used a white Auriful thread for the main quilting, and simply accented a few random points, which I think continues with the improv style.
This past Saturday was the first HH Patchwork Treffen with my girls since we've moved, and my first time back at the sewing machine in three weeks!?! Let's just say that it was a much needed sewing time, and I'm super excited to have my first project checked off my Q3 Finish-A-Long list!
Linking up this week to Let's Bee Social.